Last week my cousin Mimi made stuffed peppers and gave us some and we enjoyed them so much we wanted more.
I found a recipe on the internet called Dad's Stuffed Peppers and used it along with George's home grown tomatoes.
I removed the skins by dipping tomatoes in boiling water and then plunging them in ice water and squeezed them into small pieces.
I used brown rice from Minute rice in the little containers to microwave because we love it.
http://simplyrecipes.com/recipes/dads_stuffed_bell_peppers/
I used 6 peppers and about 1 1/2 lbs. of groun chuck and I used the tomatoes and their juice and mixed the ketchup and Tabasco sauce and the Worcestershire Sauce in with the meat mixture and it totally filled up all the peppers and I added 1/4 cup water to the pan and baked it 50 min 350 degrees uncovered.
Thursday, August 12, 2010

Sunday, August 1, 2010
Alaska July 2010 cruise with In touch and Dr. Charles Stanley
I have listened to Dr. Stanley for years and years and started listening to him when i lived with my daddy after my divorce. Michael and I both listened and I was so impacted by him and his teaching.
There is no one like him.
George and I went to the Martha's Vinyard Inspiration weekend where Dr. Stanley preached everyday for 5 days. It changed our lies.This was June 2010.
I knew when I returned home I wanted to go on the cruise which was a month later in July. Michael and I went and had the time of our lives.
Friday, May 14, 2010
BABY BIRDS 003
What a thrill to have this nest about 4 1/2 feel off the ground on this open shelf beside our garage. I have never seen baby birds this close.

Wednesday, March 31, 2010
presents from Silvia Penov
I am so excited to show everyone the beautiful presents I received from my Brazilian friend Silvia. She made me the cutest scissor case with my name embroidered on it and her mother made me a gorgeous necklace and bracelet.
She also sent me 3 new magazines that have so many great patterns and tutorials in them.
And lastly, I received Brazilian fabrics!!!!!!!!!!!!!!!!!!!
My friend Silvia is famour in Brazil for her great purse patterns and is featured in the Bolsa magazine.
Lovely lady

She also sent me 3 new magazines that have so many great patterns and tutorials in them.
And lastly, I received Brazilian fabrics!!!!!!!!!!!!!!!!!!!
My friend Silvia is famour in Brazil for her great purse patterns and is featured in the Bolsa magazine.
Lovely lady
Tuesday, February 9, 2010
Sew Along Hobo for Yahoo group
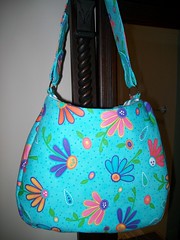
I like this picture with the handle down. This is beautiful fabric and was such fun to sew.
I used Bosal fusible fleece on the outer bag and Bosal lightweight cotton fusible interfacing on the handle and inside bag,
Hobos are my favorite bags. i like a little bigger bag myself.
I used Bosal fusible fleece on the outer bag and Bosal lightweight cotton fusible interfacing on the handle and inside bag,
Hobos are my favorite bags. i like a little bigger bag myself.
Sew Along Hobo 003
Picture 2
this shows the inside fo the bag with a zippered pocket and a slip in on the other side. You can also see the magnetic closure and the rings.
this shows the inside fo the bag with a zippered pocket and a slip in on the other side. You can also see the magnetic closure and the rings.
sew along hobo
http://www.jcarolinecreative.com/Merchant2/merchant.mvc?Store_Code=JC&Screen=HOBO_BAG
My Yahoo purse Group called sewingtotebagsandpurses
is having a sew along hosted by Kathy our Moderator. This is my contribution to the effort. I used new fabric by Moda of Me and My Sister designers.
I had a real struggle with the bag but finally won out.
My Yahoo purse Group called sewingtotebagsandpurses
is having a sew along hosted by Kathy our Moderator. This is my contribution to the effort. I used new fabric by Moda of Me and My Sister designers.
I had a real struggle with the bag but finally won out.
Monday, January 25, 2010
Make Up Bag Tutorial
I want to warn anyone who looks at the tutorial that for some reason it came up backwards. I tried to avoid that in the postings, but I guess the truth is I am not so good at the google blog.
Sewing it up Last Part 5
Sewing it up:
Unzip the zipper
Take the 2 pieces of outside fabric and put them together right
sides facing and sew up the sides and across the bottom.
Take the lining pieces and put them right sides facing and sew up
each side only.


 finished!!!!!!!!
Unzip the zipper
Take the 2 pieces of outside fabric and put them together right
sides facing and sew up the sides and across the bottom.
Take the lining pieces and put them right sides facing and sew up
each side only.

 Here you can see where I left the bottom part of the lining open.
*********It is at this point if you want your bag to stand alone
you can box the corners of both the bags before turning.
Take the side seam and the bottom seam and match them up
forming a triangle and sew across the end about 1 ½” from the tip
of the triangle. You would have to sew across t he bottom of the
lining leaving a 3” hole in the middle for turning.
Turning:
Reach through the end of the un- sewn lining and get a hold of the
outside part and pull it through the hole. Turn under the bottom of
the lining and pin and sew across. Tuck the lining down inside the
outside bag.

 finished!!!!!!!!
Loop handle Part 4

Now is the time to add the loop. Take the piece of fabric and iron it
in ½ wrong sides together lengthwise and then tuck the long side
inward to the crease and iron again and top stitch down each side.
Fold in ½ and sew across the end.
Put this piece with the end along the side of the outside piece about
an inch under the zipper and the loop will not be sticking out.
Sew across the end a couple of times and only sew this on the
outside piece. Be sure and keep the lining pieces out of the way.

Zipper Part 3
 side 1
 top stitching
Putting in the zipper Part 3

Lay an outside piece right side facing you and lay the zipper down
about ¼” down along the long edge at the top right side of zipper
down and the edge even with the edge of the fabric. Pin and sew
along the edge all the way across with your zipper foot. Lay down
on top of this a lining piece wrong side up Pin it over the zipper
and re sew along the top edge through the lining piece and the
zipper side you already sewed. Turn the lining over and top stitch
on the edge of the fabric on the outside beside the zipper. Be sure
to pull the lining down smooth against the outside piece.
Now, take this whole piece you just sewed and lay the side with
the zipper down on top of the other outside piece right side facing
you. And pin and sew across the zipper onto the outside piece.
Then take the lining piece wrong side facing you and lay it on top
of what you just sewed and sew across it again. Turn the lining
piece over and top stitch. Now you should have the whole thing
laying flat with the zipper in the middle and the pieces on either
side.

 sandwich pieces ready to quilt
Quilted Makeup Bag Tutorial Part 1
Part 1
Quilted Make up Bag Tutorial by Barbara Carter
Cutting:
Cut 2- 9 ½” by 8” rectangles out of your outside fabric
Cut 2 pieces of muslin 10” by 10”
Cut 2 pieces of foam or batting 10” 10”
Cut 2- 9 ½” by 8” rectangles out of your inside fabric
Cut a strip of either fabric 3” by 9” for a loop handle if desired
Quilting:
Quilt the outside pieces by sandwiching the foam or batting in between
the muslin and outside fabric right sides out. You can
quilt it on the diagonal 1 ½” apart or your choice of design
Using your rotary cutter, even up the rectangles and be sure to cut
off the excess muslin and foam or batting.
Saturday, January 9, 2010
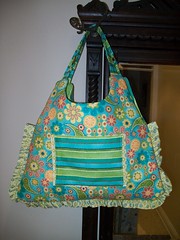
another izzy and ivy purse-FARRAH
I seem to be stuck on making izzy and ivy purses. First I made the ruffle bag twice and then I moved on to the Sassy Connie. Persevering, I made the Farrah and no( it is my favorite.
Of all the patterns so far (3) this is the easiest to read and follow. Yeah...
The fabrics are free spirit and the ruffle is marcus. It has 2 silver rectangle rings and no closure. It has an outside pocket and 2 inside slip in double pockets. I think it is adorable.
Of all the patterns so far (3) this is the easiest to read and follow. Yeah...
The fabrics are free spirit and the ruffle is marcus. It has 2 silver rectangle rings and no closure. It has an outside pocket and 2 inside slip in double pockets. I think it is adorable.
Tuesday, January 5, 2010

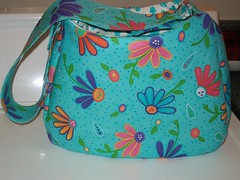
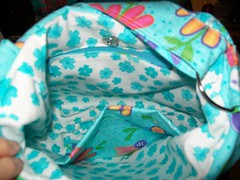
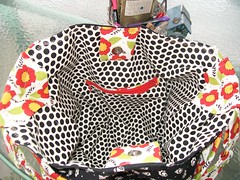
izzy and ivy sassy connie bag 018
Here is a great shot of the inside with the zipper and the cell phone holder pocket is opposite the zipper pocket. You can also see the magnetic snap tabs. The pattern called for a strip of fabric to cover the sides at the top but I decided to make it a square and turn it to be trianges on both sides. It turned out quite cute I think.
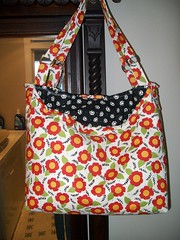
izzy and ivy sassy connie bag
Here is a good shot of the outside of the bag=the side with no outside pocekt. The lining sticks up above the the outsdie.
I had a lot of fun making this bag even if it was challenging.
I had a lot of fun making this bag even if it was challenging.
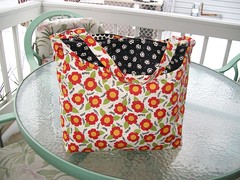
izzy and ivy sassy connie bag
Just finished my new Izzy and ivy pattern-the sassy Connie Bag. This was a super challenge and really difficult for me to make. That said, I succeeded---finally.................
The bag is really 2 bags. and it took me awhile to figure it out due to a few typos in the pattern.This first picture shows an outside dot pocket and the straps with ring loops. it also shows the lining.
This is a large bag with tons of storage room and would be wonderful for traveling. It called for magnetic snaps in the lining, but my new favorite way to do this is using tabs sewn into the lining. I like that much better.
This fabric is Mary Engelbreit for Moda . Of course, I love the flowers, and that is why i bought this fabric.
Subscribe to:
Posts (Atom)